I was a MacJuror last week. Watch to see what stocking stuffers my friends and I recommend for the geek in your life this Holiday Season!
View The MacJury post

Showing posts with label Handmade Mac Tip. Show all posts
Showing posts with label Handmade Mac Tip. Show all posts
December 10, 2012
September 20, 2012
iBank Puts the 'I' in Banking

Feature set is important if not the most important consideration when reviewing software. iBank has it covered. I can't tell you how much I appreciate the attention to detail they put into every pixel of their apps. Ever since the developer gave me a review license, I still have yet to explore all it has to offer!
You had me at color.

It's the little things like adding color to your categories that can really add to the already incredible reporting features the Mac application offers. A CPA would be happy to have you for a client using this software. (So I've been told.)
Another important factor for me in selecting a personal financial management tool — or most any other software tool for that matter — is how well its supported. IGG Software is constantly updating iBank and making improvements. They don't leave you feeling abandoned like other product developers who take years in between to release half-baked updates. They pay attention to their customers and offer a community of support.
Case in point, they've released yet another update to their already great iBank application for the Mac. (I like to think of it as "polish.") Here is one of their many press releases for your immediate review:
September 19, 2012
FOR IMMEDIATE RELEASE
IBANK 4.6 DELIVERS NEW AND IMPROVED FEATURES FOR BETTER BUDGETINGMajor Update Offers Superior Tools For Tracking Expenses And Saving Money
(PUTNEY, VT) — IGG Software today announced the release iBank 4.6, the market-leading personal finance application for Mac. This new version of iBank delivers a brand new set of tools for managing budgets, support for Retina Display Macs, and many other fixes and enhancements.
“This is the update many of iBank’s users were asking for,” says IGG president Ian Gillespie. “With so much economic uncertainty, families especially want to see where their money is going, and these new tools provide better insight into spending habits, ways to save, and day-to-day financial management. For a lot of people, this is the value proposition in iBank.”iBank 4.6’s budgeting enhancements include the following:
iBank 4.6 also adds support for Apple’s new Retina Display. Rounding out the update are additional fixes and improvements to performance, exports, bank downloads, reports, Smart Accounts and more. iBank 4.6 is free to current users of iBank 4, and is available immediately via the IGG website. It has been submitted to the Mac App Store for approval.
- Budget vs. Actual report view. Among the most popular feature requests for iBank 4, this new report view gives users a fast, easy way to visualize and compare their budgets with actual spending totals. The report view can be customized for specific time periods, and users can drill down by category to see transactions that make up their expenditures.
- Improved budget view. Now users have the ability to view and compare different periods (from the past, or future projections) in the main budget view window, to better see at a glance how spending has changed over time or how closely they are following their own budget goals.
- Faster performance and more. Besides significant speed improvements within budget functions, users can now edit the accounts used for a given budget, among other changes. Related fixes include correct updating to Actual Income and Actual Expense totals after changes to period or category.
IGG offers unlimited 30-day free trial downloads of iBank, free support (including Live Chat) and a 90-day unconditional guarantee on direct purchases from the IGG web store. The regular retail price of iBank 4 is $59.99; licensed users of iBank 3 can upgrade for $29.99. iBank 4.6 requires Mac OS X 10.6 or higher. The latest version can be downloaded at http://www.iggsoftware.com/ibank, where there is also access to a library of iBank 4 video tutorials.
IGG Software, Inc., was founded in 2003 by developer Ian Gillespie to offer intuitive, elegant and powerful applications for individuals and small businesses. Based in Putney, Vermont, its flagship products are iBank, for personal finance management, and iBiz, for time-tracking and billing. For further information, review licenses, or to schedule interviews with Ian Gillespie or CTO James Gillespie, please contact IGG Marketing Director Scott Marc Becker: scott@iggsoftware.com.

Does Your Mac Have Companions?
Mine does. So does my Husband's Mac. (as does our children's Mac!) We have a whole family of gadgets that like to play together and guess what, they have apps for them too!"iBank Mobile is an essential app for iOS devices that lets you keep track of your day-to-day spending and account balances on the go. The best iPhone finance app now includes search, multi-tasking, Retina Display support, data export and more new features! iBank for Mac users can sync transactions, accounts and categories automatically and seamlessly - via Wi-Fi (Bonjour) or any WebDAV server - for perfect personal finance management." — [source http://www.iggsoftware.com/ibankmobile/index.php]

"Honey, what was the name of that restaurant we went to last month? Want to have dinner there again?"
"I can't remember, let me check my iBank Mobile app and look at last month's dining out transactions. Oh, here it is, yes, the price of that meal was fairly reasonable and we have a coupon in our Passbook." (coming soon to an iPhone near you!)
 There are times when you don't want to be tethered to your desktop or really want a smaller form factor than a laptop but more features than an iPhone app. That's where iBank for iPad comes in. Just take a look at the gorgeous interface it offers. They even provide an interactive tutorial. That's a class act.
In conclusion, IGG Software, Inc. has created a suite of products for the consumer and small business that puts you in charge of managing your finances with helpful tools that are secure, easy to use and even easier on the eyes. The apps run on all of your devices while the most personal of information is not shared with advertisers like some of the web-based apps on the market. You control how your own information is used and there are incredibly flexible reporting features built in. The developers support and promote their product with great enthusiasm and attention to detail.
If you don't believe me, just ask this kitten.
June 28, 2012
No Voice? Use Big Words!
I recently had laryngitis for two weeks. Not only was it painful, but an even bigger challenge during our summer vacation while traveling with my two young sons to visit family and friends with even more children!
This app became invaluable for me during that time. I was able to communicate with people using this on my iPhone and iPad. I had to carefully choose my words when trying to talk to my six year old who is just learning to read, but this was a great exercise.
Big Words is a must-have tool on all your devices!
 | Big Words
DollarApp
Category: Social Networking
Updated: Oct 4, 2011
  |


May 24, 2012
What did you do 1 year ago today?
Timehop: What did you do 1 year ago today?
 Ever thought about time travel? Moms think about this stuff ALL THE TIME. What did I do one year ago? I can't even remember what I did one hour ago. We also think about cloning ourselves so we can get more done and get more sleep too.
Well, since cloning humans hasn't quite caught on yet, how about we just focus on time travel for a moment? Check out this service. It's a fun way to take a peek back into your recent history and reflect. Timehop makes it as easy as checking your email. If you know how to create an email rule or filter, you can just make yourself a folder called Journal, for example, and have your email service automatically deliver messages from Timehop to that folder. Then, when ever you're feeling like you need to reflect on the previous year, just click on that folder and see an archive of your previous posts. If you micro-journal your life in 140 like I do, this can be a useful way to look back and remind yourself of projects you may have left slide. Tweets are archived with links which can come in real handy when you want to revisit a project.
They just added support for archiving your texts from your mobile phone and I'm looking forward to trying that out. Many times I get questions about how to save texts and I think this service may just fit that bill.
Just think of all those kinky little love messages you've sent to your special someone over the course of a year. When you look back on those messages, do you think you'll say to yourself, "Yeah, rock on!" or "Ew. Seriously? So gross."
I think it's an especially great service for scatter-brained moms like me who juggle so many things that a lot can happen in the course of a year. I can read a Timehop message and think, wow, seems like just yesterday when I tweeted about my kiddo's first day of school and awww, look at the snapshot I posted! Cool!
May 20, 2012
Knightwise.com Podcast S3ep2 : Macs and Mommies
It's been so long since I've recorded but something about the summer time just seems to kick things off! (Perhaps it's that the Hubby is soon done with school for the summer - yay!) Here is a rare video version of me podcasting/vlogging with my BIB (Belgian Internet Boyfriend), Knightwise. You must check out his stuff. He and his wife are crazy geeks like us - minus kids, plus dogs. (These are my people!!)
If you know me, fast forward through all the boring parts where I talk about myself and say stuff you've probably already heard. The meaty discussion is actually entertaining to listen to and I hope it gets you thinking about how you incorporate tech into your family and in your daily lives.
Share your thoughts in the comments! I'd love to hear from you!
You can follow us on Twitter if you want to geek out across the globe.
@Knightwise and me, @TheMacMommy
Also check out my Google Plus. I plan on interacting over there more too!
May 7, 2012
Protecting Your Identity: Some Observations
A client of mine forwarded to me a message she had gotten with tips for how to protect your identity and that is what has inspired this post. Below is an edited version of what I wrote back to her. I hope you find it useful.
I just finished getting all 3 of my free credit reports from www.annualcreditreport.com
I just finished getting all 3 of my free credit reports from www.annualcreditreport.com
I won't lie, obtaining your credit report is TRICKY!! All these sites out there try their very best to get you to purchase a credit report or a credit score report using their service. They say in big, bold letters that this is all FREE but then in teeny, tiny letters elsewhere, it's only free for the first month and then if you don't cancel the membership they rope you in to, they charge your card seventeen bucks each month and for what I really don't know nor care to know!!
Just for fun, I dipped my finger into the ordering process to see where and when they ask for my credit card. I didn't get past the Terms of Service Agreement. I first wanted to know how to cancel the membership. The only instructions I could find is that you have to either go to another site and work with an "interactive" customer service representative online OR you can call a phone number. They have limited hours of operation in both cases.
Bottom line is DO NOT BITE!! You will just end up with a hole in your lip - and - wallet!
The only reason I would ever try to get and then weasel out of this is if I were looking to buy a house and I really needed to know my credit score. It may happen in the near future, but I'll cross that bridge when I get to it.
Here are some notes I copied and pasted from the website as I was going through the process. Be prepared to be perplexed by the questions they ask to verify your identity. They use a combination of trick questions and questions that you will probably easily know the answer to. For example, they stated that I may have applied for a mortgage and wanted to know which bank secured the loan. It was a trick question so I answered None of the Above. Then they tried to ask me how much the monthly payments were. Again the answer was None of the Above. So, you need to understand that they are trying to trick a thief, not you, so they can verify your identity. Take a deep breath and try to remember what the answers might be. Try to answer them quickly though before the website session times out! From what I experienced, the questions they ask are relevant to the past few years, not like who was your best friend when you were five years old.
The first on my list was TransUnion. This is their welcome message:
Thank you for selecting TransUnion for your FREE Personal Credit Report.Your credit report is just moments away.To protect your privacy, we'll ask you a few questions to verify your identity.To complete the next section, you may need to refer to information including, but not limited to, your credit cards, loans and mortgages. Please have any statements or documents available.Please make sure you have the ability to print if you would like to retain your credit report.
To receive your free credit report online, you must complete the identity verification process. If you don't wish to complete the process online or you can't complete it online, you may obtain your free credit report by phone or mail. You can only go through the online identity verification process once per year.Please Note: Before continuing, you'll need to verify that the information displayed below is accurate. To make changes, please visit www.annualcreditreport.com.
But….but…..it's FREE, FREE, FREE!!!!
(maybe, but you'll have to work for it! Sorry, my anxiety isn't free. It costs a dollar a pill for Zoloft!!)
"Start your 7-day risk-free trial, $16.95/month thereafter! Cancel anytime during the trial period free of charge, or do nothing to have your membership continue without interruption. "A member may cancel at any time. To cancel your membership please contact our Customer Service Team. For contact information and hours of service go to https://tui.transunion.com/contact.jsp.
Yeah, uh huh. Suuuuuure. Oh, how convenient it is that the website is currently closed! Gee, I wonder what language the phone operator will speak when I call? What's YOUR guess?
Here is a screen shot of what it looked like as I completed printing to PDF the first of the three reports.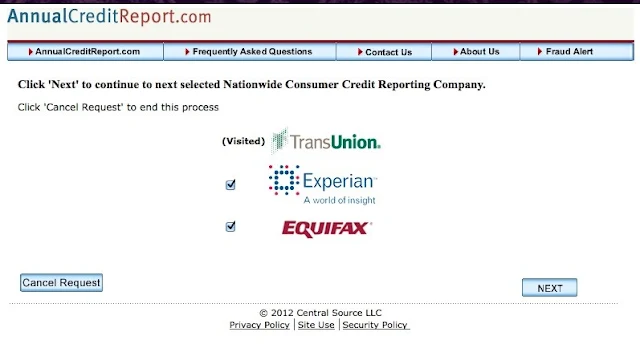
One mistake I made was not changing the Print to PDF settings to make it print in color. I ended up with a greyscale version which isn't as easy on the eyes. Oh bother! At the end of getting the Experian report, they told me this:
To return to your Experian report in the near future, log on to www.experian.com/consumer and select "View your report again" or "Dispute" and enter your Report Number.
So, I tried doing something similar on the TransUnion site, but no luck! Bummer. Oh well, at least I have the report now.
This next section I copied and pasted from one of the websites regarding your rights to this information. I thought it was pretty important.
Remedying the Effects of Identity Theft
To learn more about identity theft and how to deal with its consequences, visit www.consumer.gov/idtheft, or write to the FTC. You may have additional rights under state law. For more information, contact your local consumer protection agency or your state attorney general.
- Identity theft occurs when someone uses your name, Social Security number, date of birth, or other identifying information, without authority, to commit fraud. For example, someone may have committed identity theft by using your personal information to open a credit card account or get a loan in your name. For more information, visit www.consumer.gov/idtheft or write to: FTC, Consumer Response Center, Room 130-B, 600 Pennsylvania Avenue, N.W. Washington, D.C., 20580.
- The Fair Credit Reporting Act (FCRA) gives you specific rights when you are, or believe that you are, the victim of identity theft. Here is a brief summary of the rights designed to help you recover from identity theft.
- You have the right to ask that nationwide consumer reporting agencies place "fraud alerts" in your file to let potential creditors and others know that you may be a victim of identity theft. A fraud alert can make it more difficult for someone to get credit in your name because it tells creditors to follow certain procedures to protect you. It also may delay your ability to obtain credit. You may place a fraud alert in your file by calling just one of the three nationwide consumer reporting agencies. As soon as that agency processes your fraud alert, it will notify the other two, which then also must place fraud alerts in your file.
- An initial fraud alert stays in your file for at least 90 days. An extended alert stays in your file for seven years. To place either of these alerts, a consumer reporting agency will require you to provide appropriate proof of your identity, which may include your Social Security number. If you ask for an extended alert, you will have to provide an identity theft report. An identity theft report includes a copy of a report you have filed with a federal, state, or local law enforcement agency, and additional information a consumer reporting agency may require you to submit. For more detailed information about the identity theft report, visit www.consumer.gov/idtheft.
- Equifax: 1-800-525-6285; www.equifax.com
- Experian: 1-888-397-3742; www.experian.com
- TransUnion: 1-800-680-7289; www.transunion.com
- You have the right to free copies of the information in your file (your "file disclosure"). An initial fraud alert entitles you to a copy of all the information in your file at each of the three nationwide agencies, and an extended alert entitles you to two free file disclosures in a 12-month period following the placing of the alert. These additional disclosures may help you detect signs of fraud, for example, whether fraudulent accounts have been opened in your name or whether someone has reported a change in your address. Once a year, you also have the right to a free copy of the information in your file at any consumer reporting agency, if you believe it has inaccurate information due to fraud, such as identity theft. You also have the ability to obtain additional free file disclosures under other provisions of the FCRA. See www.ftc.gov/credit.
- You have the right to obtain documents relating to fraudulent transactions made or accounts opened using your personal information. A creditor or other business must give you copies of applications and other business records relating to transactions and accounts that resulted from the theft of your identity, if you ask for them in writing. A business may ask you for proof of your identity, a police report, and an affidavit before giving you the documents. It also may specify an address for you to send your request. Under certain circumstances, a business can refuse to provide you with these documents. See www.consumer.gov/idtheft.
- You have the right to obtain information from a debt collector. If you ask, a debt collector must provide you with certain information about the debt you believe was incurred in your name by an identity thief - like the name of the creditor and the amount of the debt.
- If you believe information in your file results from identity theft, you have the right to ask that a consumer reporting agency block that information from your file. An identity thief may run up bills in your name and not pay them. Information about the unpaid bills may appear on your consumer report. Should you decide to ask a consumer reporting agency to block the reporting of this information, you must identify the information to block, and provide the consumer reporting agency with proof of your identity and a copy of your identity theft report. The consumer reporting agency can refuse or cancel your request for a block if, for example, you don't provide the necessary documentation, or where the block results from an error or a material misrepresentation of fact made by you. If the agency declines or rescinds the block, it must notify you. Once a debt resulting from identity theft has been blocked, a person or business with notice of the block may not sell, transfer, or place the debt for collection.
- You also may prevent businesses from reporting information about you to consumer reporting agencies if you believe the information is a result of identity theft. To do so, you must send your request to the address specified by the business that reports the information to the consumer reporting agency. The business will expect you to identify what information you do not want reported and to provide an identity theft report.
In addition to the new rights and procedures to help consumers deal with the effects of identity theft, the FCRA has many other important consumer protections. They are described in more detail at www.ftc.gov/credit.
Claim 1. Do not sign the back of your credit cards. Instead, put 'PHOTO ID REQUIRED.'
- I don't understand the point of this! Here is an article that explains why it's just bad advice:
- http://www.creditcards.com/credit-card-news/sign-or-write-see-ID-1282.php
- Even safer yet, don't write out paper checks to pay bills, reduce the amount of human eyeballs on your digits. Pay bills online.
- Second verse, same as the first! Even safer yet, don't write out paper checks to pay bills, reduce the amount of human eyeballs on your digits. Pay bills online, shop online (you'll save on tax and many times shipping plus it's delivered to your door and then you save on gas in your car. When purchasing goods or services at a store, use your check or debit card. Using the card is just like writing a check but it's quicker, more secure, plus it gives you a digital bread crumb trail that you can track and search when need be to file your taxes or keep an eye on your account
- Forget the copy machine and especially one at a public facility like a Kinkos — not safe — your information could be stolen from the imprints left behind. Use your scanner. The ultimate for this method of securing your identity is to scan all your wallet contents then file the images with corresponding database entries in 1Password. Once you have all of that information entered, you can print out a hard copy to be filed away in a fire-proof safe. Also, make backups of that digital data and keep it encrypted. This way, if the need ever arises, you can actually READ the information because it will be printed out in crisp text, not some blurry photocopy. If your wallet has been stolen, chances are you'll be in such a panic that your eyes might not work as well and you'll be stressed about locating that information quickly. Why not make it easier on yourself and just print out a 1Password report that is easier to read and understand!
- Using the information above that you gather for contacts, it's essential to report your missing or stolen identity to the proper authorities where usually THEY will issue the cancellation and get you set up with a new card. Follow the proper channels for the least amount of headache. Reclaiming your identity can become a full time job! Sad, but true.
- Most definitely! Look for your local police department or identity theft department and include those numbers on the list of those to call in the case of a stolen identity emergency.
- You can do this online and it is relatively easy and not too time consuming. You are granted one FREE credit report per year. If you've been a victim of identity theft then you get more than one.
Equifax: 1-800-525-6285
Experian (formerly TRW): 1-888-397-3742
Trans Union : 1-800-680 7289
Social Security Administration (fraud line): 1-800-269-0271
- I double-checked these numbers against the ones I obtained while completing the process and they are the same with the websites added on for another contact method
- Equifax: 1-800-525-6285; www.equifax.com
- Experian: 1-888-397-3742; www.experian.com
- TransUnion: 1-800-680-7289; www.transunion.com
September 7, 2011

July 12, 2011
Information Management: It's a Beautiful Thing
Do you have a password manager?
Does your password manager also manage details of your software purchases?
Does it sync across multiple devices and platforms?
Are the software developers totally awesome?
Are compatible mobile apps available that show you the same information when you need it at the drop of a hat?
These are questions you should ask yourself when looking at software to manage your most intimate personal data. Save yourself. Go here: http://agilebits.com/products/1Password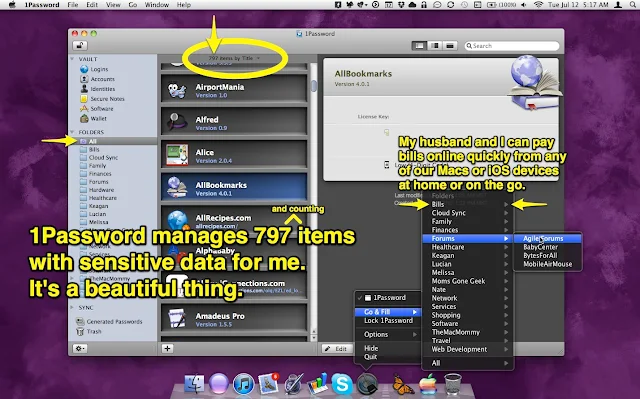

April 17, 2011
Spreadsheeting the Love

iWork Numbers Invoice
[Edit: I've added a link to the original Numbers document in addition to the Template version. Enjoy!]
[Edit: I've added a link to the original Numbers document in addition to the Template version. Enjoy!]
Hand-Made Mac Tip No. 15
Taking the Spreadsheet to the Next Level - Spreadsheeting the Love
Did you know you can create a customized template with iWork Numbers?
(Please note: there is no 's' on the end of iWork. The application that preceeded it was called AppleWorks and that did end with an 's.' Sorry, pet peeve of mine.)
Did you know that Apple's iWork Numbers is the equivalent to Microsoft's Office Excel?
Did you know that Numbers can do more than just create a plain old spreadsheet? You can actually design something extremely usable with Numbers!
I've been working on this project for some time now and I'm pretty pleased with the results. I'd like to share it with you and would love some feedback if you decide to use it and modify it to suit your own needs. I've created a customizable invoice that will calculate time and pricing using a series of sliders and cells where you enter variable information.
Sure, Numbers does come with its own ready-made templates for which there are invoices. I took a look at them first to be sure I wasn't reinventing the wheel. I didn't like any of them. They just didn't do what I wanted my invoice to do for me. Like with many of our technological advances, when you can't find it, you build it.
 |
| Here is a screen shot of what one of my TheMacMommy invoices looks like. Click to view larger. |
So, this is what I've built: a client invoice to send to my clients showing them how much they owe me and how I arrived at the total. I also use it to document what we worked on during our sessions together. Tech support is not cheap. I at least try to make it affordable for my clients so they call me back again and again.
Until I find a better solution, I've been using PayPal to invoice my clients so they can pay me online using their credit card or bank account. Most of my elderly clients still prefer writing out a check, which is fine and I can deposit it to my bank account using my iPhone camera. That method is free, and takes a bit to clear, while PayPal is somewhat convenient and helps me keep better accounting for my taxes. I still don't like the cut PayPal takes though (even though I realize I'm paying for convenience) and pretty soon I'll be needing to hire some part time childcare and will need that money for a babysitter.
The way it's working for me is I first create an invoice for my client using the Numbers document I've built. I plug in all the variable information and type up my session notes. Then, I log in to PayPal and use the custom invoice template I created there and plug in the same information regarding fees, rates, hours and dates (not enough room for session notes though). If the totals match up, then I know I've got everything accounted for. That makes me feel more confident to bill the client.

Here is where you can download the Numbers Template File I created using iWork Numbers '09 version 2.0.5. If you want to original Numbers document, you can download it here.
I'd love it if someone could try this out on an iPad and let me know if it works!
Once I've created an invoice for a client, I then save it as a PDF file using the nomenclature of YYYYMMDD_LASTNAME (of the client). The date I use is the date of the invoice to make it easier.
This screen shot shows you the path of where you should save the template file. Once the file is placed in your Home/Library/Application Support/iWork/Numbers/Templates/My Templates folder, you can then launch Numbers and select File/New from Template Chooser/My Templates (from the sidebar)/Generic Consulting Invoice.
 |
| Click on the image to enlarge it so you can read the path at the bottom. |
Development
This all started with a spreadsheet I created in Numbers. Then one night, I asked my science teacher of a husband to help me adjust the formulas to make the cells calculate time and present me with a total. We both kept tinkering with the settings and features in the Numbers Inspector and finally beat it into submission.
Every couple of days I would just keep tweaking it and moving cells around and adjusting formatting until I felt it could be a viable tool to use in my consulting business. Sure, I KNOW there is an app for this...I know there are probably over 50 that might do it on my iPhone easier. I just had much more fun creating this on my own. I can only imagine this might be somewhat similar to what application developers might experience when they create an app. I enjoy working with the user interface of iWork products. I think they are beautifully designed and very intuitive.
Every time I use Numbers or Pages, I'm always amazed at what these applications have to offer. (I wish I had more use for Keynote because it has a gorgeous interface!) Having come from a printing, production and graphics background using Pro applications like Quark Xpress and Adobe InDesign, that's saying a lot. I used to consider myself a real snob and couldn't be bothered with the inferior AppleWorks or other lowly "desktop publishing" applications. I loathed converting files from programs like "Punisher" — which was my pet name for MS Publisher. I just hated the interfaces and it rose my blood pressure whenever I had to take some layperson's "design" and make it print-ready. Despite being damn good at it, I didn't like being a Production Artist.
Years ago, I cringed whenever I heard the words "desktop publishing." I used to correct people whenever they asked me if I was a "desktop publisher." I would correct them by saying, "No, a desktop publisher would be my little brother making greeting cards on his PC. I use a Mac and have a Bachelor of Fine Arts degree in Communication Design, therefore I am a designer." (and you have to say it in a really snobby voice and elongate the "i" sound in deeeee-siiiiiiigner.)
Much of that changed when I exited the printing industry and started honing my technical skills. I realized that maybe it wasn't all that bad being a Production Artist and started focusing more on my skills in the areas of production, training and troubleshooting. When I started working in the education field as a site technician, I no longer had the luxury and access of using Adobe products like Photoshop or Illustrator. I had to make do with whatever the schools could afford and so I forced myself to become proficient in using the Apple products that came with the machines or could be had for educational pricing. Even though I could still use my creative side, it was the enjoyment I found in teaching staff and students how to use creative applications like AppleWorks or even TuxPaint. I learned how to embrace desktop publishing and ironically, became an advocate for it. Working in a school setting, in my opinion, really teaches you how to be frugal. So, if a teacher wanted fancy certificates for her 5th grade class, then I took pride in creating a turn-key workflow for her using the AppleWorks database feature combined with the built-in fancy borders. It made them happy and I felt like a rock star.
I'm still rather picky about certain things that have been programmed into my brain from college professors. I still think some of them might be proud of me if they could see some of the things I've designed over the years. I've gotten very creative when it comes to tweaking user interfaces and pointing out to consumer level users the intricacies that they might never have noticed on their own. My eyes are trained to see details that others might not see and I utilize that in my teaching much of the time.
I wish more people used iWork and really learned how to make it a replacement for Microsoft Office. It always pains me when I watch my husband use Word. He gets so frustrated when it just won't do what he'd like it to do. Having a former typesetter for a wife hasn't helped him much as I've berated him over the years about using single spaces and properly formatting text the way I was trained as a designer.
I understand people's needs to just use what they know. I just wish for people to step outside of that zone a little bit and try something that might alleviate some pressure and strain. You know, um, Think Different. I would like for others to experience the satisfaction I get from my computing experience. Creating this invoice for my business use was technically work, but I enjoyed working on it and it felt rewarding to create something that would later save me time and do the work FOR me.
Instead of swearing at your computer because it's just not computing the way you told it to, give iWork a chance and use a product that doesn't actually make you feel like you're doing, well, work. You might be surprised or even delighted.
Please leave me a comment if you've found this useful. I enjoy getting feedback :) Happy tinkering!
February 11, 2011
Mommy's Little Monsters
Lady Gaga's got her Little Monsters.

I do too.
Mine are volume partitions on bare external drives I have connected to an old PowerBook G4 that has a busted screen. I mount them via FireWire 800 using a "toaster" a.k.a. Newer Technology Voyager Dock. This one's name is Backup_Grover. You know... "Near!" "Far!" "Near!" "Far!"
All because Hubby didn't like my previous nomenclature using the date, time or drive size formats. He said, "Can't we just call them Bert and Ernie?"
"Fine." I made it so.
 I named the first drive partitions Bert and Ernie but then I decided I wanted to go with a theme for the rest of them so I named them all for Sesame Street Monsters. I have several drives, both partitioned and single with various monster names such as Elmo, Telly, Zoe, Oscar, and Murray. I even made my own disk icons for each one.
Depending on what mood I'm in, I can mount them so I have little monsters pop up in my Dock, Sidebar or on my Desktop. I really like to see them in the Time Machine Preference Pane window.
It just kinda makes you WANT to be sure you're doing your backups, right?
So, what have you named YOUR hard drives?
November 27, 2010
How To Add Special FX Photos to Your Address Book Cards
Hand-Made Mac Tip No. 14
How To Add Special FX Photos to Your Address Book Cards
I discovered some funky, new photo editing features in Snow Leopard's version of Address Book!
 When you edit a contact card, you can also assign a photo to that individual by double-clicking on the photo icon.
Below that, there are two buttons. The camera button is for taking a photo using the built in webcam. The button to the right of that is for adding special effects. I can't remember off the top of my head if these were present in Leopard, but I'm just discovering them now.
There are six different choices. Try on a few for yourself!
You know, it's soon time to get those holiday cards out in the mail. Next time you're digging around in your Address Book, pruning and gardening your contacts database, you might want to have some fun with a few of the faces in there.


August 28, 2010
Wrong Date or Time Stamps on Photos & Videos & How To Archive Them
Hand-Made Mac Tip No. 13
Wrong Date or Time Stamps on Photos & Videos & How To Archive Them

 Right around the holidays, my mother-in-law and I were exchanging files from our camera chips. She had captured some really cute video footage of Lucian at his preschool holiday party. After I finished importing the files, I went to go view the photos and video in iPhoto but couldn't find them! I thought I was losing it. I could swear they imported properly! Usually, the newest photos and videos show up at the top because I've specified that I want it to view that way. I looked up and down, but these recent imports were no where to be found.

When I archive the videos, I copy them twice. Once onto an external drive partition separate from my Time Machine backup partition. I repeat this process on another drive partitioned the same way located off site. Once I label them green, that means they've been archived twice on two separate drives and it's safe to remove them from my local hard drive on my laptop if I choose to do so to save space.

You might not think this is a big deal, but when you're swapping digital files between family members, it helps when your camera's are synched up. Imagine five years from now, you're trying to view a collection of photos and videos of a family member's birth — or wedding and reception. You're scrolling through a beautiful slideshow but it gets confusing because the photos are out of order! The first couple of photos are in order — there's the baby getting weighed, there's the baby in grandma's arms, there's the baby — wait....why are these photos next ??— that's from the baby shower? Huh? The next few photos jump back to the hospital and then another few are from a different time. This is particularly annoying when looking through wedding photos that are out of order.

This is why I take it upon myself to manually name my movie files using date format soon after the event because you never know if the data will reflect the true time stamp. I also try my best to name, tag, and comment on photos in iPhoto as much as I can and back up my iPhoto library on a regular basis. It's a practice I'd encourage you to try. It's best to try and manage the data right away rather than discovering problems with it years down the road when you no longer remember what happened and when. Maybe you won't even care, but maybe, just maybe, you or someone else will.
Wrong Date or Time Stamps on Photos & Videos & How To Archive Them

I was archiving some audio files today and discovered some of them had the wrong date stamp in the Finder's list view when sorted by "Date Created" so I thought I'd share this tip.
You just never know when the OS is going to bork your time/date stamp. It happens periodically and sometimes the time stamp does not transfer properly when burning files onto a disk or transferring to an external hard drive. Sometimes some of the data has become corrupted but is still perfectly useable. You can view the photo or video just fine, but the metadata – or time stamp – is wrong — REALLY wrong, like Y2K wonky! Sometimes it's the operating system, sometimes devices are not properly configured by the user, for example, in the case of a digital camera.
You just never know when the OS is going to bork your time/date stamp. It happens periodically and sometimes the time stamp does not transfer properly when burning files onto a disk or transferring to an external hard drive. Sometimes some of the data has become corrupted but is still perfectly useable. You can view the photo or video just fine, but the metadata – or time stamp – is wrong — REALLY wrong, like Y2K wonky! Sometimes it's the operating system, sometimes devices are not properly configured by the user, for example, in the case of a digital camera.
I discovered this when my mother-in-law got a brand new digital camera last year. She was so excited about it and started using it right away and was trying to learn about all the features as she went along. That's how I do it — manuals??! we don't need no stinking manuals!!
In our family, we always swap our camera chips/SD cards so that we all have the same collection of photos taken by each other when we get together for special occasions where all the cameras are out snapping away. This way there's a backup of everyone's precious memories all over the place — and at different ends of the country sometimes. Most all of us have a MacBook of some flavor with iPhoto so it's very quick and easy to download the photos and videos off the chips and be on our separate ways.

Luckily, I do not store my video files in iPhoto permanently. After some time I usually go back through my iPhoto library and move all of the videos to my Movies folder into the appropriate year folder. Then, I go through and manually rename the file names to the date and use a short description of what the movie clip is about. If it's a clip about the same thing, I add 01, 02, 03, etc. to the end. It's also much easier to navigate and locate clips in Front Row because they list nicely in a hierarchy by date and description. I use iPhoto to view & present photos and Front Row to view and present video.

When I archive the videos, I copy them twice. Once onto an external drive partition separate from my Time Machine backup partition. I repeat this process on another drive partitioned the same way located off site. Once I label them green, that means they've been archived twice on two separate drives and it's safe to remove them from my local hard drive on my laptop if I choose to do so to save space.
I don't bother to rename most all of my photos because I feel iPhoto does a decent job of managing everything for me and I can usually find what I'm looking for quickly by scrubbing through my Events. I'm fairly anal about it. There are some times where I may need to rename a file and for that I can use the batch feature in iPhoto or export them and do it manually in the Finder.
Now, in the case of the missing import from my mother-in-law's camera, the search feature in iPhoto is what saved the day. I was able to just type "movie" as the search term and this way it narrowed the results because I only keep a small amount of movie files in iPhoto before they get archived. I was able to locate the few movies that had been recently imported and that's when I discovered the date stamp was wrong which is what caused them to become buried in the 2009 files when I was expecting to see something in the January 2010 section at the top. It turns out, her camera was not properly formatted for the correct date nor time zone! Sometimes new cameras are formatted with the current date and time, but most times, you must set it up yourself. If you leave the date stamp on your photos where it shows up in the lower right corner, you might notice this, but that's not always on by default either.

You might not think this is a big deal, but when you're swapping digital files between family members, it helps when your camera's are synched up. Imagine five years from now, you're trying to view a collection of photos and videos of a family member's birth — or wedding and reception. You're scrolling through a beautiful slideshow but it gets confusing because the photos are out of order! The first couple of photos are in order — there's the baby getting weighed, there's the baby in grandma's arms, there's the baby — wait....why are these photos next ??— that's from the baby shower? Huh? The next few photos jump back to the hospital and then another few are from a different time. This is particularly annoying when looking through wedding photos that are out of order.
Now, imagine there are three different cameras being used on that special day. The first camera is set to the current date and time zone because the user went through the camera settings and configured it properly. The second camera was taken out of the box and never tinkered with. The third camera belongs to a family member visiting from the other side of the country where the time zone is three hours different and that camera has been configured to their local time.
Do you see what's happening here?
Many times it's just not convenient or even proper to school your 78-year-old Aunt Henrietta who barely speaks English about her fancy new gadget. You're lucky she even handed you her camera to pop out the chip so you could download it and you were able to convince her that you didn't just break her camera and no, there really isn't any film inside of it.
I have no idea why these voice memos from my iPhone did not save the correct date in the Finder listing but it's not helpful when I go looking for something and my search criteria or sorting is by date and time. Luckily the default file naming nomenclature IS date/time, albeit an ugly version of it that uses punctuation, which is why I clean up my file names removing the special characters. It's a habit from my days as a pre-press technician when I used to preflight files for printing service bureaus. Either way, I had no idea what these voice memos were about without listening to them. Now that I've renamed them, I'll know what to look for when searching later on.

This is why I take it upon myself to manually name my movie files using date format soon after the event because you never know if the data will reflect the true time stamp. I also try my best to name, tag, and comment on photos in iPhoto as much as I can and back up my iPhoto library on a regular basis. It's a practice I'd encourage you to try. It's best to try and manage the data right away rather than discovering problems with it years down the road when you no longer remember what happened and when. Maybe you won't even care, but maybe, just maybe, you or someone else will.
So now, my mother-in-law's camera is set to the correct date and time. When we swap chips, our photos are in the correct order. I can tell which ones she took versus mine because hers is a Kodak and mine is a Canon and they prefix the filenames differently. I can use the batch comment feature in iPhoto to make a note of which photos she took because I believe credit where credit is due.
I hope this may have cleared up a little bit of the mystery surrounding time and date stamps on media files and what you can do about it.
Be a thinker. Don't be afraid to tinker!
September 30, 2009
How to Make an Application Inventory
Hand-Made Mac Tip No. 12
How to Make an Application Inventory
I've been dragging my feet about upgrading to Snow Leopard. Reason being, I wanted to make sure all my apps will be compatible. I need this machine for work for when I do consulting, so if I upgrade, I want to make sure everything works so there are no surprises down the road when I go to demonstrate something for a client.
There is a pretty extensive list in the form of a wiki here that shows which applications will work with Snow Leopard and which are buggy yet. I wanted to check my own applications list against this for compatibility. Problem was, I didn't really have a good inventory list of all my apps, let alone license keys, so I set out to create one in a spreadsheet format that I could stash away somewhere for safekeeping in the event of another upgrade, or God-forbid, catastrophic loss which might result in a clean install of every piece of software I own.
Here is a handy way to get started by getting all the application names into a spreadsheet using iWork Numbers (or Excel).
I could have sworn at some point in time — and this may be reaching as far back as the days of Mac OS 9 — that you used to be able to just highlight all of the application names using the list view in the Finder sorted by Name, then copy and paste them into either a text document or spreadsheet and they would just magically appear in alphabetical order. When I try this now, however, I get mixed results. It just doesn't work that way anymore. You may get a list of apps, but the names are duplicated several times over and it's just messy.
I also remember the days, again in OS 9, when you could simply print out a Finder window's contents. This came in extremely handy when I was a production manager preflighting jobs for print services in ad agencies. I had a handy system in which I would neatly organize and gather all of the print-ready data onto a CD and then print the window contents out, fold the paper a certain way and it was an instant CD cover for the jewel case that told you exactly what was on the CD that went out to the client. That feature disappeared for some reason as well in the new OS X system. I always wondered why they brought labels back, but not the Print Finder Window feature.
Well, there is a third party solution to the rescue. It's called, appropriately, PrintWindow 4.0. It does just what it says it does and even snazzier than the old grayscale teeny icons of OS9.

So what does this have to do with making an inventory list in a spreadsheet format you ask?
Well, it turns out, that if you print this list to a PDF, you can then view the PDF, press command A to highlight and select all of the text, then command P to paste the text into a spreadsheet. This will give you an alphabetical listing of all of the applications in the Applications folder.
 It's easy-peasy. Just launch PrintWindow – either from the Dock, or you can do like me and put the icon in your toolbar of your Finder so it's handy. Next, select File, then Print Folder Listing. Navigate to your Applications folder and select it. Then follow the rest of the settings, it's pretty self explanatory. Just be sure to sort by name.
http://skitch.com/macmommy1228/nb8uq/applicationlisting (<---- link to larger image)
In the screen shot above you can see my Applications Finder window with the status at the bottom indicating that I have 181 applications in that folder. Next, you can see that when I copied and pasted the names from the PDF into the spreadsheet, the total number also matches by looking at the last line in that spreadsheet. This tells me I got them all copied.
From here, I can now go about tweaking my spreadsheet and adding in important information like serial numbers and versions. Later on, I can then sort the columns however I'd like or add check marks to remind me which applications are ready and which are not for Snow Leopard. This will help me to better decide when to upgrade and which applications I'll need to upgrade along with it. I might even add a column for the vendor link so that I can just run down the list later and click on the links to go to the download page for the updated software.
OCD is so much fun when you have the right tool for the job!
I hope you've enjoyed this Hand-Made Mac Tip!
May 3, 2009
Getting and Staying Organized on Your Mac

Hand-Made Mac Tip No. 11
Organization on the Mac – Just a Few Tips
I've been given a challenge! I've been asked to share some tips on organizing things on a Mac. Whoa! How do I love thee topic, let me count the ways!! I can't tell you how many times I have helped clients learn how to free themselves of clutter on their desktops, so I thought it best if I just blog about it and hope I can help even more Mac users learn how to be more productive with their computers. I mean, you did purchase a computer to do some of the thinking for you, right? So, make your computer do what it was built to do: compute! oh, and scrapbook and crop photos and organize addresses in alphabetical order, and print labels, word process, design, make movies and, and, and....stop fussing with it already! Clean it up and let it do it's job so you can enjoy the results!
@littlebytesnews put me up to the challenge of answering a question for @JessicaKnows. In her post, "Setting Up the MacBook Air: Personalizing it for Productivity," Jessica asks her community for pointers to resources for being organized and more productive on a Mac. Well, Jessica, this Hand-Made Mac Tip is for you!
Keep in mind, this is coming from a Mom, so it's a bit of a "go clean your room!" kind of tone — which, let's face it, many of us need a little pep-talk about organization and productivity from time to time — so here goes! (and by the way, I'm not assuming that Jessica is like other Mac users I've helped, so this is a general-applies to anyone-something you should consider set of recommendations. For all I know, Jessica is a nutty clean freak like me and knows all of this stuff already!)
Clear off your Desktop and KEEP it that way!
Clear off your Desktop and KEEP it that way!
I mean EVERYTHING. I'm serious about this. Do it!! Not even your Hard Drive icon. So many people are so shocked by this. YOU DO NOT NEED TO KEEP YOUR HARD DRIVE ICON ON YOUR DESKTOP!! The "Macintosh HD" desktop icon is from the old days of OS 9 before the Finder existed and users had to double-click on that icon to access their files.
Only use your Desktop for emergencies – like files or folders that must be dealt with right away but make a promise to yourself that you won't allow them to stay there for more than a day or two. It will force you to deal with it and keep things neat and tidy. (I know, but isn't everything a deal-with-it-right-away file?)
To start getting organized, create a new folder inside your Documents folder and call it Desktop Stuff. Then select all of the files on your desktop and put them in that folder and work from within THAT folder and put files where they need to go.
Explore Spaces.
Before I continue on with more Finder tips, I also want to share an valuable tip for those of you using Leopard 10.5x. If you're a twitter addict like me, you know that twitter can sometimes hamper productivity. Give twitter its own SPACE! Use the Spaces application and assign your twitter application of choice to a space and then also assign a key combo to it so you can quickly toggle that space on or off. For example, I have my twitter application (trying out a few right at the moment to say which just yet) assigned to Space 2 and then I have command-arrow (doesn't matter which) mapped to that space. Now whenever I want to indulge in twitter, I just press command-arrow to the right on my keyboard and then again to move it completely out of sight, out of mind! (ok, well, never out of mind, really, but at least not an obvious distraction while not in front of me!)
I also have Exposé mapped to command F11 and so I can easily move items from space to space. I've been using this method for so long now that it's embedded in my muscle memory and I don't have to look at the keys to swipe twitter off the screen or move another "bothersome" habit to another space.
I hope you try this out. It took me a long time to embrace it but once I did, I wasn't sorry.
Get with the times. Use the Finder!
No, not in the upper left corner, down on the Dock — that trusty little smiley face that is ALWAYS there for you! The Finder application always gets overlooked because the beloved hard drive icon is still so prominent and ingrained in everyone's muscle memory. People still decorate it by changing the name to something unique and giving it a special icon. I say, why double click on another piece of Desktop "schtuff" that really doesn't need to be there when you can single click on the Dock that is always there by default!
Even though I don't keep my hard drive icon on my Desktop, I still rename my hard drive and give it a special icon because I manage several computers on a network here in our home so our computers are named "Mommy, Daddy and Lucian." (Depending on how you access multiple computers on a network, sometimes it's nice to see the different icons show up.) But see, now with another baby on the way, I'll eventually have to rename "Lucian's" computer because it will some day be shared so maybe it will be called "Kids" or something like that. Moral of the story is, if you're going to get fancy, make a decision about the name when you first set up your computer and stick with it. Changing the name later could cause undesirable consequences down the road because of bad mapping. Also, don't use special characters like ampersands and God-forbid slashes. Avoid bad juju.
I can not tell you how many times I have given tech support to someone and discovered their "Macintosh HD" is actually now called ";;;;;;;;kdfk;lsdrkjhfg" because a kid or a cat got access to the keyboard and started pressing buttons. It happens and it can happen to you— the most careful of all people. Eliminate the liability by hiding the hard drive icon from the Desktop. I promise, you're not deleting your hard drive! It's just an interface change, that is all. Your hard drive is still there. You can still see it in the Sidebar.
Go to Finder/Preferences (this time you do click on the word Finder in the Menu Bar at the top of the screen.) Under the General tab, uncheck all things that normally show on the desktop - turn them off. Train yourself to use the Finder icon in the Dock to navigate to all places. The new Finder Window will have everything you need at just one click if you customize your Sidebar and organize it well. You do not need have to access your "Macintosh HD" icon unless you know what you're looking for at the root level. That's another reason why I encourage people to ditch the double click of the HD icon. It's too tempting to store files at that root level when they don't belong there.
May the Force Finder be with you.
By using the Finder as the app it truly is — an application you use to find or navigate to items on your computer's hard drive — you will truly begin to understand the system of hierarchy and better organization — and with that — computer zen!
Navigate to all items for which you are looking for using a Finder window. A Finder window is a lot like a spreadsheet with sortable columns. You can view items in alphabetical order, by date, size, etc. Poke around in the columns at the top and try clicking on them. Most of the time you'll want to keep it organized by alphabetical order, but there are some times where you want to view it by date.
If you can't read the entire line because it's truncated, put your pointer on the line that separates each column, click and drag out to the right to expand once you see the pointer arrow change to a line with arrows on each side. It takes some finesse but you'll get used to it.
Check out the Preferences available in the Finder application (from the Finder Menu at the top) and click on those different icons to see what they do. Enlarge the icons and text size to make it easier on your eyes to avoid computer screen strain. The Finder Preferences should be one of the VERY FIRST areas you explore when trying to organize a new computer or re-organize an old one. Unfortunately, the Finder is always so overlooked because we take it for granted and don't treat it like the built-in productivity application that it truly is.
Customize the Toolbar at the top of Finder windows.
This is one of the most neglected areas of your new-found productivity application within the Finder. Most people just accept the default set of buttons but I say — don't just settle! Get more buttons! Simply click on the Finder in the Dock to open a new window, then select the View menu from the Menu Bar at the top and then choose Customize Toolbar. You'll be presented with a drop-down sheet from which you can pick by clicking and dragging from a selection of buttons to add to or remove from your tool bar. The first things I always add are the "new folder" and "delete" buttons.
Use the Home folders for their intended purposes – keep your Home tidy.
Keep only Applications in the Applications Folder. Keep or file photos in the Pictures folder. Put movies into the Movies Folder. (There are reasons, i.e. Front Row app, for why these specific folders have been called out inside the Home folder, so don't mess with that juju.) You'll know you're in the Home folder because it's a folder with a house icon and it's the same as your user name on your computer.
File EVERYTHING in separate subfolders inside the Documents folder and KEEP IT THAT WAY. It takes discipline, but you too can achieve this zen so that each time you sit at your computer you are only a few clicks away from everything. Anything else is searchable by Spotlight so no worries. Do not file anything inside of any of the other folders inside of your Home folder except for Documents, Downloads, Pictures, Movies, and Music. Be sure that those folders just mentioned are accessible from your Sidebar in the Finder window.
The Sidebar is your new friend!
You can drag and position a folder alias onto the Sidebar of a Finder window just like you do in the Dock by dragging the icon over and dropping it into a space (as opposed to on top of another folder – be careful not to do that!!) Just like in the Dock, you can re-order the folders into the order in which you access them the most.
Create subfolders inside of the Documents folder and file everything in there, every time. For those folders you need access to the most, just drag that folder icon from inside the Documents folder out to the Sidebar. You're not physically moving the folder, you're just creating a shortcut to that folder in the Sidebar. (Remember aliases on the Desktop? I think this is similar to "pinning" something to the Start menu for PC users who may have switched.) For example, I have a subfolder called Projects. Inside of that folder I have more folders, like a folder called "TheMacMommy" where I store artwork and ideas. Since these folders are nested deeper in the hierarchy, I just simply drag the particular folder icon out to my Sidebar and now each of these areas are just 2 clicks away. One click on the Finder icon in the Dock and one click on the folder icon in the Sidebar.
Use colored Labels and fancy icons if it helps you stay focused, but try your best to work with just the Documents folder for everything. There really is no need for you to access many of the other areas because they are mainly just access points for other applications. For example, if you use iPhoto to manage all of your photos, then the only thing inside that folder is your iPhoto Library and you wouldn't even need to keep it on your Sidebar unless you plan to manage at least some photos manually.
I use a screen shot application (I love) called Skitch and that application creates and manages a folder called Skitch inside of the Pictures folder. Same goes for the Photo Booth application. There are folders that live in there that belong to those applications.
Prefer the Downloads Folder to keep your Desktop clean.
Tell your Mail.app and Browser, i.e. Firefox, Safari - whatever you prefer, to put all Downloads into the Downloads folder. Just launch the application, go to the Preferences menu from the Menu Bar and look for the place to specify where you want downloads to go.
Downloads are the fastest way to junk up your Desktop so why not tell the apps to do the work of filing for you? Keep the Downloads folder handy in your Sidebar and then file from that Downloads folder to the appropriate subfolder inside of the Documents folder accordingly.
Downloads are the fastest way to junk up your Desktop so why not tell the apps to do the work of filing for you? Keep the Downloads folder handy in your Sidebar and then file from that Downloads folder to the appropriate subfolder inside of the Documents folder accordingly.
Organize your Dock.
Get rid of application shortcuts you never use. Just drag them out of the Dock till they go "poof!" Put the icons in the order that you're most comfortable with. I like to keep my Dock icons organized by category for the most part. Where you put your Dock icons is important because you will develop a muscle memory around the placement.
For the longest time, I tried keeping my twitter client over to the left near the other "communication" icons like Mail, Address Book, iChat, etc. Finally, I stopped fighting my natural tendency to mouse around near the right side of the Dock for my twitter fix interaction so I just moved the icon over there and that feels comfortable to me.
Find your built-in productivity tool.
As you can see, the productivity tool of choice that I am recommending here is already built in — the Finder. Make the Finder more productive by using the buttons, sorting, one-click access, Sidebar, search window, labeling, disk burn, etc. It's all right there at your finger tips and totally customizable for your needs.
I hope these basic tips have helped and maybe provide some new-found gems within the OS X user interface we've come to know and love. Of course, there are so many more, but these are the things that I've managed to eek out of my "pregnancy brain" at the moment. I know I'll think of more as soon as I press publish, but that's what these Hand-Made Mac Tips are for!
Enjoy being Organized!
Subscribe to:
Posts (Atom)